Tuesday, May 31, 2011

Changes

Life is full of changes and some of them aren't so easy.  With so many moves in the last 3 years it can really test your faith in God, wondering is this really where we are supposed to be?
 
We lived in the same house for twenty years in a neighborhood you felt safe in and loved and now everything has changed and uncertain.  Now we are in a new state, house, neighborhood, climate, and everything else that goes with it. 

As I was looking for a verse for this picture, this one kept coming back to me to use "they were glad when it grew calm, and he guided them to their desired haven".  We have always wanted to live near the ocean and now that we do we can say that God has brought us to our desired haven but it wasn't easy getting here.  We do face challenges all the time but I think that if God gave us everything we wanted or needed we might think we don't need HIM, so hence the challenges.  

I loved the way it turned out and new I would use it in the scripture and a snapshot. It has been easier for my husband to adjust so that is why I wanted him to be looking at the ocean so as to show his peace.  I am the one who needs reassuring so with my face turned and looking I represent the need to seek God with all the changes and ask for peace and safety.

This picture was taken on Tybee Island as we watched the beautiful sunset.  I used the monochrome setting, (which states it takes the picture in single color and this was supposed to be in blue).  May this be an encouragement to you in your changes in life.
xo
barb

Monday, May 30, 2011

Happy Memorial Day!!!!!!


Let us remember those who gave their life for our freedom because freedom isn't free!!!  I have a daughter who is in the Army and I know what it feels like to have her in harms way but thankful she is still with us.  I couldn't imagine those who have lost loved ones but I am thankful for their sacrifice for my freedom!   I have found these two videos that I feel represent this most important day.


xo
barb

Sunday, May 29, 2011

Grandkids, Ice Cream, & Sparklers

On Thursday I drove up to South Carolina so that I could see my grand kids before they move and to see my granddaughter receive an award on the schools morning show on Friday.  I met my daughter at the hotel that we would be staying at and then headed over to pickup the kids.  We decided to bring them to McDonald's and get them ice cream cones and then go to a playground so they could just have fun.  So off to McDonald's we go.  This was the first time Caleb got to go with us because he was just so shy but finnaly he decided to come and he was so excited.

I almost forgot to take pictures of them eating the cones and was so glad when it popped into my head.  Austin is always the joker and fun to see what he does in front of the camera.

Cheyenne is so sweet and always has to sit next to me which I just love.

Caleb was fun to watch because he just wouldn't care if he got ice cream up his nose and this one wasn't the one that really got up his nose but didn't capture that one, darn.  He couldn't keep up with the melting so he ate what he wanted then played and ate some more.

As I said Austin is the joker so I just love these pictures.

Cheyenne had to get into the crazy picture taking too.  They are so fun to be around you just never know what to expect.

The kids weren't sure of the sparklers at first but when they got the hang of it they had so much fun.

Austin was funny because he had to have his water bottle strapped on at all times, I suppose in case he needed to put out the fire.

Cheyenne notices the little things and loves to have her picture taken and what a cutie she is.  She said she was the Statue of Liberty.

I had this picture taken just before we left after the sparklers and loved how it turned out. It is always a trick to get all the kids to have the perfect smile at the same time so when you get them doing their thing it really makes for the best shot.  I did some saturation effects on this one because it was very grainy when taken but this I like.  We had a wonderful evening and I loved every minute.
xo
barb

Thursday, May 26, 2011

I Made My Own Laundry Detergent!

I was excited to find a blog post on how to make your own laundry detergent for under $13.00 bucks!  Laundry detergent is so expensive and you really don't get a whole lot for your money so when I saw how to make your own, I was sold at first sight!!!  Plus, here is the pretty popcorn tin I decorated just for this wonderful soap.

I just love the smell of the detergent when you open the lid it just smells clean.

Here are the ingredients you will need and you can find them in the laundry soap section of the grocery store. 
4 lbs. Borax
4 lbs. Arm & Hammer Washing Soda
4 lbs. Arm & Hammer Baking Soda

3 bars Fels Naptha Bar Soap - each bar is 5 1/2 oz.
Find a container to store your soap in and add all three boxes. This will make 16 lbs so make sure it is big enough and has a tight seal.

Then take the bars of soap and shred them before adding it to the soap mixture.

Here I used a cheese shredder that I had and it worked great.

When its done it looks like a bowl of shredded cheese but smells heavenly.

Add it to the other dry ingredients (sounds like something to bake doesn't it).

Give it a good mix.

And wa-la your own laundry soap!

Each load only takes 1-2 tablespoons (hard to believe) and I had this pretty china cup that holds about 4 tablespoons so I know to only use half for a super size load.  Isn't it cute just sitting in the soap?

This is how much I use for a load, not much.

I have the tin sitting on the dryer with my vintage iron I bought years ago and doesn't the paint on the iron just match the tin?  I didn't plan this but I love it!  I have used the laundry soap a few times and love the smell of the clothes when you take them out of the washer, so clean smelling.  This makes about 150 loads of soap how amazing!!!  I will start to buy some ingredients a little at a time so when I run out I have everything I need to make another batch. I will not go back to buying premixed again!! 
I found this at the   The Beehive Cottage  so please go there to someone who has been using it for awhile and talks about front loader machines.  I will do a post when I have to make another batch just to see how long it took me to use it.  I hope you are excited to try your hand at it too, HAPPY WASHING!!!
xo
barb

Sunday, May 22, 2011

Sorry It's Taken

While going for a walk this morning on Tybee Island with my hubby, we came across this nice size shelland I said "Wow look at that one"!   When we came up to it of course someone was living in it, DARN!!  Most of the best shells you find on the beach are occupied with hermit crabs and if they weren't so ugly I would rip them out and keep the shell!  No I don't think I could do that but it sure sounds like a good idea. 
Look close at this picture and you can see him in there and can I say "it is so ugly and creepy looking" I couldn't even touch it. So again, we leave it and walk away.  We must have seen 8 other perfect shells and they were all taken over with hermit crabs.

Last year (when we were just newbies here) we found a nice white shell on the beach just like this one and brought it home. We did look it over but didn't see anything in it.  We put the shell on a shelf above the sink and I would keep finding it in the sink.  I would think to myself why is this always in the sink?  Well, after a few days it started to smell and it took a few days to figure it out that there was something living in the shell!!  Can I say Pee U!!!!  Now we always check to see if something is living in them before we bring them home, but why can't they pick a little less attractive shell and leave some of the good ones for us!:)
xo
barb

Saturday, May 21, 2011

Finding Safety

When I read this verse it reminds me that my safety is staying close to God, where I can build a life and family knowing I will be watched over with our lives.  So many times I forget this and am thankful that the Lord will send this verse to me when I need it most. 
I am in the process of finding a church to attend so that I may find the strength, encouragement, love, and peace that fellow believers can give....which is how God shows us his love through them which is a way to stay close to him.
The NIV Life Application Study Bible commentary says:
84:1-4
The writer longed to get away from the bustling world to meet God inside his dwelling place, his holy temple.  We can meet God anywhere, at any time.  But we know that going into a church building can help us step aside from the busy mainstream of life so we can quietly meditate and pray.  We find joy not only in the beautiful building but also in the prayers, music, lessons, sermons, and fellowship.
I pray that you have a wonderful weekend and thanks for stopping by to spend time with God and His Word, may it be an encouragement to you. (Picture taken in my studio with my favorite birdcage, nest, ceramic eggs {made my me}, and the beautiful flowers from my daughter for Mother's Day. Camera setting on a low saturation to give the shabby chic effect.)
xo
barb

Wednesday, May 18, 2011

Large Popcorn Tin Makeover

I am always on the lookout for tins when I am at the thrift stores because I like to store things in them.  I usually go for the floral or just plain fun ones and I had come across two large popcorn tins. I have a purpose for this large tin so I had to get going on the makeover.  I am a lover of old hat boxes but don't love the antique prices so I came up with this idea and just loved how it turned out.  So this is my process of this gem.

You usually find these tins at Christmas and I rarely see this shape at the thrift stores so you know I will be getting a tin this Christmas!  This is what it looks like before I start the transformation.

You need to give it a good sanding before you put on the spray paint.  I didn't use a primer since I already had the pink so I just skipped that step.  I will see if it matters as I use this one and then see if I need to change for the next one.

I used a indoor/outdoor paint in gloss by Krylon and of course in PINK!

As I was covering the base I found out that the pink paint wasn't covering the pattern on the tin but I knew I was going to cover it with wallpaper so it didn't matter.

Now that I am finished with the spray paint it is time for the wallpaper.

I had bought these two papers at the thrift store not knowing what I would use them for but for just $.99 each how could you pass it up.  
I chose the floral for the lid on the outside and traced the lid for the pattern and did some trimming so that it sat in about a 1/4  inch so I could paint on the tin.

Add the modge podge.

I used a brayer to make sure all the air bubbles where out.


I chose the stripe for the inside cover and used the lid to make the pattern and trimmed to make it fit.

I trimmed it as close as I could but it wasn't perfect and that's okay.

I chose the floral for the inside bottom because this was the more durable one and perfect for what I will use this for.  Hmmm what can that be?

Again I used the base of the tin for the pattern but had to trim to fit and then used the modge podge to glue down.  Oh so pretty!!

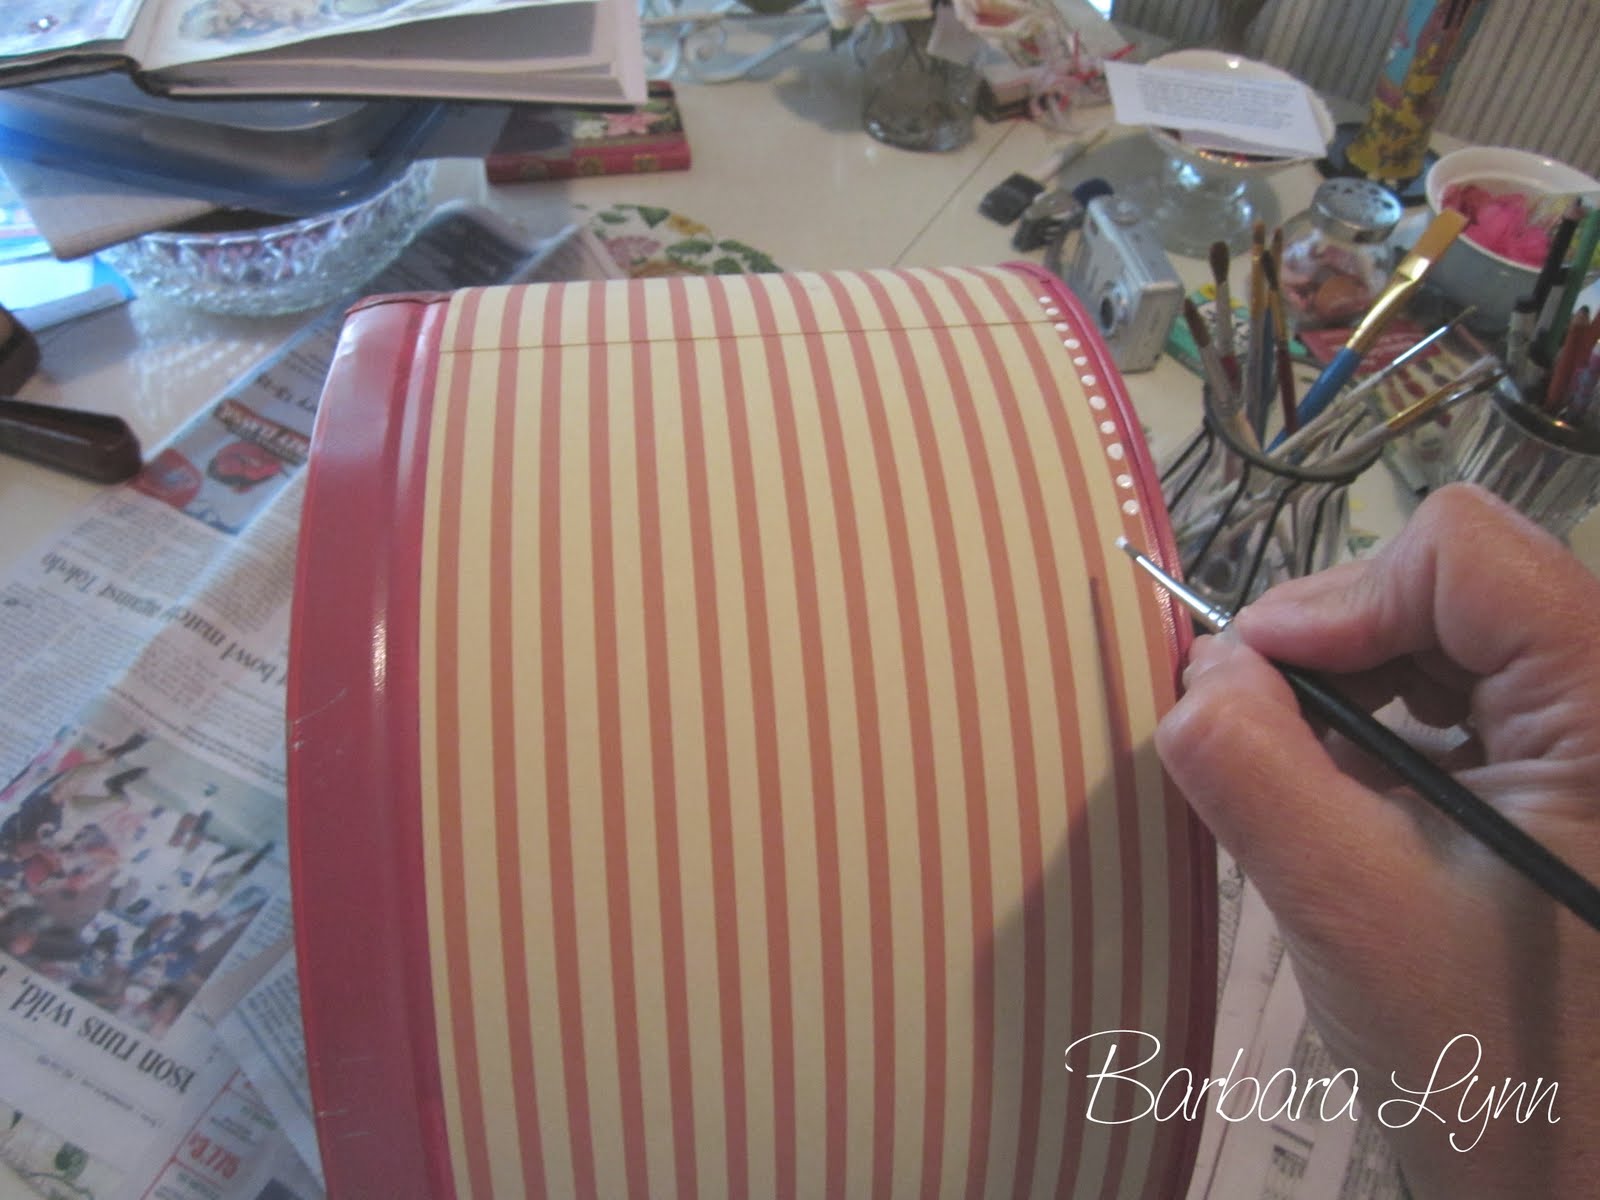
Next came the outside and this was a little bit of a challenge.  I didn't think ahead that I should have allowed a 1/4 inch from the bottom of the lip so that I could paint on, so I would do that for the ones in the future.  I wrapped the paper around the tin and left about two inches just to make sure and trimmed.  It was so nice that this one was stripped because it made it easy to cut perfectly.

When I was applying the glue I moved quickly so that it wouldn't dry because it was so big.  It was a challenge but I got it and luckily you can move it around a bit once you apply it to make sure everything lines up.

Whew so glad I didn't get glue all over while trying to put it on!  I think it would be easier if you had someone help you on this step.

Mission accomplished!!!   Don't you just love it? 

Now for the painting.  I used a green around the edge of the wallpaper then started adding white dots all the way around the lid.  I am copying the pattern I used for my Valentine heart box project because I love that so much and thought it would look great on this too.

I then did some swirls along the edge of the floral paper.  I decided to use a pink that would stand out but match the spray paint at the same time.

Then I did some white dots around the base too just to give it some detail.

This is the finished lid and I absolutely love it.  When the white dots dried I did a smaller pink dot on top and then used a white gel pen around the pink swirls to make them stand out a bit more.

On the base I also did a small pink dot on top of the white just to give it some detail and I love it.

This is the before and after and who ever said you can't make your own hat box!!!  It turned out just as I had hoped and will be perfect for what I have in store for this.  Watch for a upcoming post on what I use this for I can't wait to show you.  Thanks for stopping by I so enjoy our art classes together.
xo
barb